2. Settings and fine tuning for bird photography
Your camera’s menu and control buttons allow for a multitude of settings options. Many are irrelevant for everyday photography, some are positively unhelpful, but a few are crucial. Familiarize yourself with the essentials, and some basic photographic principles, to get the most from your camera.
a. ISO
ISO is a measure of the sensor’s sensitivity to light: the greater the number the more sensitive the camera is to light. Image ‘noise’ (the equivalent of film grain) increases with ISO but in good light the effect is trivial with ISO settings under 800. You might choose 200-400 ISO if photographing relatively static subjects, but switch perhaps to 800-1,000 ISO for birds in flight. Increasing the ISO allows you to use faster shutter speeds and greater depths of field, both advantageous features for action shots.
b. Aperture and depth of field
The depth of field of a lens is the zone of focus either side of the focal plane; with telephoto lenses it is extremely limited, often just a few millimetres. The zone is variable and determined by the aperture of the lens – the larger the f-stop number, the smaller the aperture and the greater the depth of field. In most circumstances an aperture between f/8 and f/11 is advisable.

By using a 600mm lens and 1.4x converter to photograph this White-crowned Black Wheatear the depth of field is limited, throwing the background pleasingly out of focus. ©Paul Sterry/BPOTY
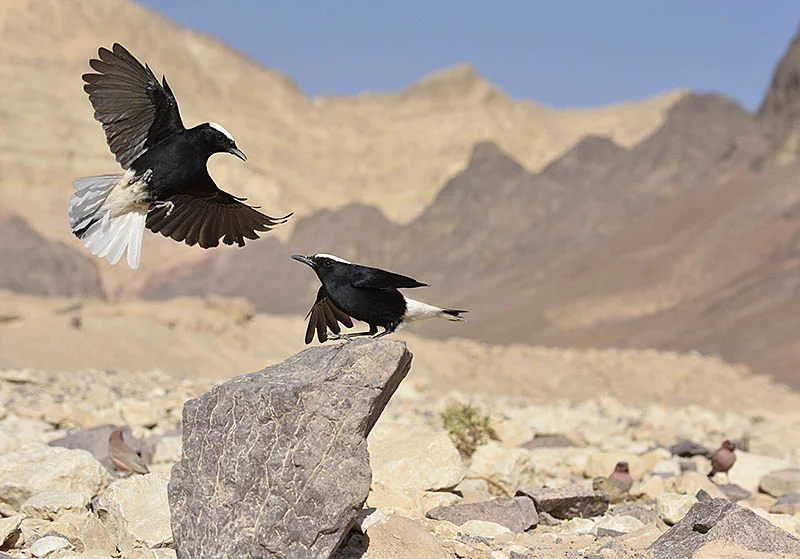
In the same situation, using a zoom lens as 80mm meant these White-crowned Black Wheatears were placed in environmental context because of the great depth of field. ©Paul Sterry/BPOTY
c. Exposure and exposure compensation
The amount of light reaching the sensor is determined by shutter speed (how long the shutter is open) and lens aperture diameter (given as an f-stop number). There is a direct relationship between the two: decrease aperture by one f-stop (eg from f/8 to f/11) and you double the shutter time needed for the correct exposure at the same ISO.
Generally it is best to rely on your camera’s ability to determine exposure automatically and digital sensors can cope with a wide range of brightness and shadows in a single frame. But with a pale bird against a background dark, you will need to think about the exposure. Activate the highlight alert feature on playback (or scrutinize the histogram) to be sure that highlights have not been ‘blown’; if they have then compensate accordingly. Consider using -0.3EV Exposure Value compensation as your default setting; but with a white tern set against dark blue sea you might require -1.3EV or even -1.7EV. No single setting will suit all types of photography so keep monitoring your playback previews and adjust exposure compensation accordingly. Return your settings to your personal default at the end of a session requiring exposure adjustments.

Exposure compensation of -1.7EV was needed to ensure the whites in this juvenile Kittiwake were not ‘blown’. Tweaking during the editing process returned the previously dark sea to an appropriate level. ©Paul Sterry/BPOTY
d. Hand-holding and image stabilisation
Some telephoto lenses are simply too heavy to hand-hold for any length of time. But if you adopt this approach with smaller lenses, a rule of thumb gives you some parameters to work with: to minimise ‘camera shake’ shutter speed needs to roughly equal or exceed the focal length of the lens. These days most lenses have inbuilt image stabilization which enables stability at slower shutter speeds than normal (claims of two stops are made). Remember that image stabilization works on the camera and lens, and has no effect on a moving subject. And sometimes it can be a disadvantage: when using a tripod under certain circumstances, or fast shutter speed, for example. So be prepared to disable this function at certain times.
e. Image formats
Modern digital image files are huge and to avoid clogging up their camera’s memory cards most photographers opt to save their images in compressed format. There are two routinely used options: RAW format, whose lossless compression produces relatively large files; and JPEG format whose adjustable compression is not lossless but whose resulting files sizes are relatively small. Both have advantages and disadvantages. More information is captured using RAW when compared to JPEG format, and potentially more information can be retrieved from RAW files if, for example, you have subtly ‘blown’ the highlights. But with everyday bird photography it is almost impossible to tell the difference between results taken using optimum quality JPEGs and those obtained with RAW files. And if you are shooting thousands of images in a single session then file size, with its implications for storage and processing, can be significant. Ultimately it is a personal choice so take the same shot in RAW and JPEG and make the comparison for yourself.
Turn off any internal image sharpening in your camera and archive your best images on your home computer as unsharpened TIFF files, a format that does not employ compression. Only apply sharpening to file copies that have been resized to the required output dimensions.

One of these Reed Warbler images was captured as a high quality JPEG while the other was captured in RAW. In terms of publishable detail, spot the difference. ©Paul Sterry/BPOTY

©Paul Sterry/BPOTY